Qajaq is the Greenlandic word for what we know as a kayak. Although what we know as kayak apparently is refereed to in Greenlandic as “qajaqriaq” which means “like a kayak.”
Original qajaqs are built as “skin on frame” boats. This means that a wooden skeleton is assembled and then covered with a waterproof animal skin (Today synthetic material).
These fascinating boats were constructed by Inuit people in the arctic regions of Alaska, Canada, and Greenland. In these blog we will be using the words kayak and qajaq interchangeably. These small boats use anthropomorphic units of measurement to tailor the fitting of the boat to its paddler.
The initial setting of the boat starts from the gunwales or top, which differs from the building of other boats that usually start from the keel or bottom.
With the exception of this first posts this blog will be updated regularly by students in charge of reporting the progress of our group and project.
We hope to attract some followers and share with you this fascinating experience.
“A mind that is stretched by a new experience can never return to its original dimension”
-Ralph Waldo Emerson
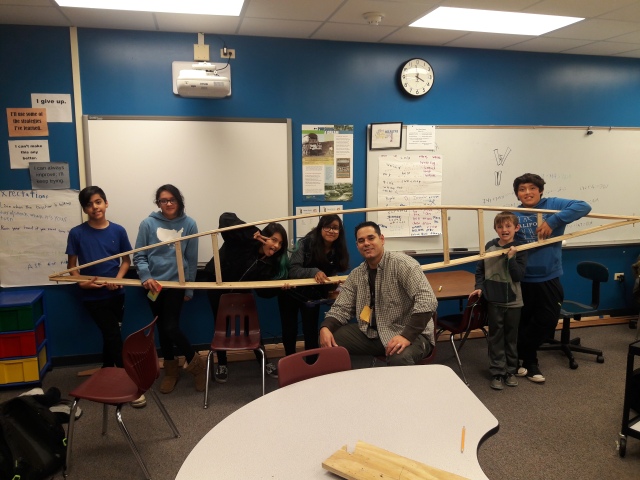
What if i told you, there are a group of 6th graders building and cutting pieces of wood to make a kayak. This type of kayak was made a long time ago. Which means the kayaks back then were harder to build. The kayaks back then were harder and took more time to build. However today they’re less harder to build. However there are still people who build a kayak out of wood.
What the 6th graders have to face is to work together and continue building them over and over it did take the 6th grade kids are putting them together, along with other pieces of wood onto the kayak to continue building the kayak.
Before we start cutting the wood we measure the wood to know how much wood we will cut or else we might mess up and not cut it right and just waste wood that could have been helpful to the kayak later on (double-check as well when measuring.) After we measure we mark the wood to know where we will cut the wood and not have to re-measure again and not waste time on doing the whole process of measuring all over again.
In order to finish the kayak we have to use the eskimo knot method. The kayak group is almost complete with both kayaks. Thank you for reading this blog.
In this digital era sometimes we get to meet and interact with people for years without getting to know them personally. A blessing or a curse some may say, but it can’t be denied that technology expands our reach beyond our usual 20 mile radius from where we live.
Thanks to the magic of technology and sources such as Craigslist is that got to James Wood Mill. Now let me back up a bit to explain the importance of finding someone like James when you are building a boat.
If you have ever built a boat or have flirted with the idea of building one, you might have read that bending wood is part of the deal and an almost a science in itself. Well, I am not a wood expert. As a matter of fact, I have been foreign to the northern hemisphere wood collection for my first 27 years of life; it is now when I am becoming more acquainted with different kinds of woods and their features. With that said, white oak and ash seem to be the most utilized species for bending stock in boat building. However, if you buy white oak or ash from a local hardware store your bending wood experience will be plagued with lots of frustrations. The brittle layers of wood will inevitably snap in every piece of stock. Why? Because the wood has been dried in a kiln where all the moisture content has been extracted, leaving the micro-porous cellulose between the wood grain bone dried. Unfortunately, the wood, once dried, cannot regain its moisture unless the wood has been dried naturally outside. This kind of wood is what is known as “green wood” or air dried
Nice Saturday trip just over an hour from Woodridge, IL.
Here is where James Wood Mill comes into play since he has been a great source of knowledge and green wood for our kayak project.
I contacted James a couple of years back through one of his adds on Craigslist, and not only was he accommodating delivering the wood for us right at our school but he was also a wealth of information.
The wood he gave us made the job of bending the kaya’s ribs an unreal and fascinating experience. We cut our rib stock in slats 1/4 inch thick by 1 inch in width, and length according to the rib length needed. After about ten minutes in the steam box, the hard unbendable oak became so soft and malleable that it is actually difficult to keep them straight.
This school year 2018- 2019, to replenish our green white oak supply I decided to travel to Johnsburg, IL, and visit James. To my surprise, James is not only very knowledgeable about wood cutting but he is what I would call an authentic “renaissance man.” He has quite the wood operation right in his backyard, including his own kiln. Plus he also is equipped to tackle the fabrication of mechanical parts for cars and tractors, rebuild engines and other sophisticated parts that require surgeon-like precision. He is an avid gardener, electrician and has even dabbed into the science of oil extraction from herbs for homeopathic purposes among many other endeavors and lost arts.
If you are ever in need of any off-the-beaten path wood specialty or product, including fancy cutting boards, I highly recommend getting in touch with James Wood Mill. You will not regret.
This year one of the challenges for our after school program was to build one of the kayaks out of regular pine wood you can find at any local hardware store. In this case, I picked up a couple of 14 Ft long boards (1×4) for under $12. A total steal, when you compare that to the price of those boards in cedar and clear(no knots).
With the boards being a little bit shorter there was another element of concern: Could the boards handle getting shaped as the gunwales without snapping? Well, I thought to myself, if native people managed to build kayaks from driftwood washed ashore and have lasted for centuries we shouldn’t be so picky trying to find perfect pieces of wood. Besides, this one kayak will be only for display.
With that said though, I figure someone could potentially put a kayak together for under or around $100 if instead of ballistic nylon canvas is used.
Which means…that the pile of wood is actually looking like a kayak.
I always get the feeling that prior to this moment this is the most frustrating part for students and any first timer in boat building. There are so many measurements to figure out on the gunwales that it seems to take forever. In our case, the students have a hard time visualizing the final product, so any explanation is sort of foggy for them. They don’t know what is the top or bottom, bow or stern, and if they do at some point any reference is quickly lost. They just see lines and kind of tag along with instructions.
The last stage before getting the gunwales on the forms is to mortise the lower part of each gunwale with a slot that will host the hull ribs. For this process, we used a Dremel tool with a regular 1/4″ drill bit. Mounting the tool on a router plunger we proceeded to drill three holes next to each other and then connected them using the router.
Here on the left you can see the mortises for the ribs. They are about 3/4″ deep, and 8″apart.
On the right, the first kayak gets shaped up on the forms. Students were excited to finally see something that actually looks like a Qajaq.
Beams are getting will be getting in place now, pegged and lashed with artificial sinew.
This year has begun with lots of energy and cohesion among the group. we have decided we will be producing two kayaks this year. One of them will be auctioned or raffled( we have not decided yet) and the other will be partially finished.
One of the most attractive features of a skin o frame kayak is its frame. Neatly put together, perfect fittings and lashes that show the symmetry of nothing short from a piece of art. Hopefully, that’s what the partial kayak will look like so that we can display it on one of our walls for our students and visitors to enjoy.
I always think about the experience we are providing to our students with hopes that sometime in the future they will be able to look back and remember their tenacity to overcome obstacles, persevere and succeed in anything they put their heart into.
Like any other kayak we start, everything begins with the “storyboard.” That’s the term used by Cunningham in his book Building the Greenland kayak. This is basically an 8 Ft board. After finding the middle point on this board the paddler sits and we look for a point of balance to produce the rest of the marks. These reference points are where the feet will be and where the footrest should be. Likewise, it’s important to determine where the backrest beam will be and the “Masik” or thigh brace between the hips and knees.
If you are ever considering building a kayak one the greatest things is that the fitting to your body is perfect! Not only is the boat super lightweight, easy to carry on a shoulder but the control in the water is great.
Here are some pictures of our students working the marks on the storyboard and transferring them later onto the gunwales( Longest pieces of wood in the kayak that go from the bow to the stern). They transferred the marks by finding first the middle in the length of the gunwales and matching it with the middle point of the storyboard.
We would love to see some other schools building kayaks and enjoying this experience with young kids.
I have some ideas in mind that I will be implementing as time goes on to make the project easier and self-led by students.
Much appreciated any suggestion or question to make this site better; also keep checking this blog, we will be posting more updates from this 2018-2019 project.
You can also follow us through Twitter at castillo@60517
Yes! It’s that bitter-sweet time of the year when we start feeling that summer is slipping away and leaves are getting ready to let themselves go with any gust of wind. Which also means that kids are going back to school and we are setting up for a new adventure.
Last year our students were so busy that we had to sacrifice some of our posts. However, the project came to an end and the experience will sure last a life time for those who participated.
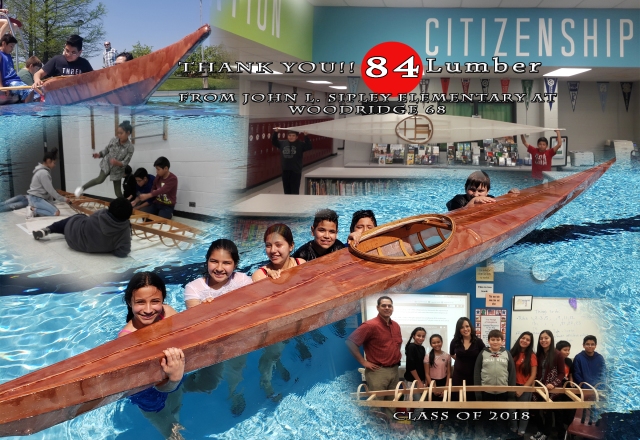
we want to thank 84 Lumber for their generous donation to our group. Thanks to them we will have the needed material for this year’s project.
I have meant to share this with the 84 Lumber store, and will personally delivering a framed print of this image.
For those who were following us, thank you for your support and I promise you we will get better about posting updates and explanations of the procedure.
If you are building a Greenland kayak and need help or would like to contribute to our project with some personal tips, please feel free to do so in the comments section of any of our posts.
Make sure you visit us again after October 2nd, when we will resume our after school sessions.
It is now Thursday and students are currently working on the cockpit. The students are now sewing it in to the kayak, to do this we are gonna attach the sinew to the needle and the all we need to do is sew it across the whole cockpit and after that we will just need to waterproof it and dye it the color that we’d like after that we will be all done, I know crazy right?!
For now we will be working hard towards finishing our dearest kayak!
We are absolutely thrilled that we only need to do very little things to tidy up our kayak adventure. To finish our kayak we would only need to do brief additions such as:
List of things to do:
The Cockpit
Finish tying the Ballistic Nylon
Dying the Ballistic Nylon
and trying to ride it.
We have made lots of progress over the past weeks and we are trying our hardest to finish our kayak. We are currently working on finish tying the Ballistic nylon. after this we will only have the slightest things to do, we will gladly yet dreadfully finished with our beloved kayak.
We started our daily after school program. We have been working toward finishing our kayak, since we now have our Ballistic Nylon (the fabric we use to cover our kayak) we will be starting to sow it together to make it waterproof and then we will be arranging it to sew it on our kayak. We will have to sew this very tightly this will help to keep all the pieces from inside firmly and intact with everything else in the kayak.
After we finish sewing the Ballistic Nylon we will be almost about done with our kayak,but till then we have some photos of our progress:
We are very excited to say that we are almost done. Although we are very upset we will be parting from our amazing adventure of making the kayak, We are proud that weh. Since we have reinforced and made many friendships and build teamwork along the way. We are very proud to say we only need some tiny touches to be done with our dearest kayak.
We only need to do some things such as finish the stringers,oil the boat, sow the skin,and oil the skin. We would be done with all that we need and we would be able to test it in the WATER!.
News!: We are looking for a name for our kayak,so feel free to comment any name suggestions.